Synchronize InviteDesk Event With Salesforce
Learn how to correctly synchronise your InviteDesk event with Salesforce, including all required pre‑steps, naming conventions, and GDPR‑compliant audience handling. This guide walks you through the automatic creation of Salesforce child campaigns, linking them to the correct parent campaigns, and ensuring contacts and registrants sync smoothly between systems.

Before syncing your InviteDesk event with Salesforce, please ensure the following:
- Do not activate any email communication until everything is fully ready: Only activate emails when the content, list, and timing are final and approved. Once activated, emails may send immediately depending on your sending date and time configured.
- Ensure the parent campaign already exists in Salesforce: A parent campaign must be created in Salesforce before synchronization. During synchronization process, a child campaign will be automatically created in Salesforce and you must link it under this parent structure.
- Use a proper naming convention for your InviteDesk event (Example: BE 25CD016 Spark Event NL): The child campaign created in Salesforce will automatically use exactly the same name as the event in InviteDesk. Using the correct naming convention ensures consistency and proper reporting.
A summary how InviteDesk ↔ Salesforce Synchronisation Works
Once your event is synchronised with Salesforce, the following steps take place:
Process Flow | Description |
1. Automatic creation of the child campaign | A Salesforce child campaign will be created automatically using the event name from InviteDesk. This process takes anywhere from a few seconds to a maximum of 10 minutes. |
2. Add a parent campaign to the child campaign | Linking the parent campaign is essential. It ensures that new leads registering for the event are routed to the correct country lead queue. |
3. Uploading your audience list | To upload your target list to the child campaign: Submit your request to the Data & Targeting Team using the segmentation request form. The team will manage the file upload and segmentation according to your requirements. |
4. GDPR Compliance | Only Contacts with explicit event opt-in must be added to the event Salesforce campaign. Adding contacts without an event preference goes against SD Worx Marketing’s GDPR rules. |
5. Automatic sync from Salesforce to InviteDesk | After the Data & Targeting team uploads the opted‑in contacts, they will automatically sync to the Invite List in InviteDesk. Sync typically completes within a few minutes depending on list size. |
6. Handling of Leads | Leads do not sync from Salesforce to InviteDesk. However, if a Lead submits the event registration form, they will: ✔️ Enter the InviteDesk registrant list, ✔️ Sync to the Salesforce event child campaign as a campaign member (Lead), ✔️ Be added to the appropriate country lead queue. |
7. Automatic Member Status updates | Member statuses in the Salesforce child campaign update automatically based on InviteDesk activity. Examples include:
|
Step by Step - Synchronize Your InviteDesk Event with Salesforce
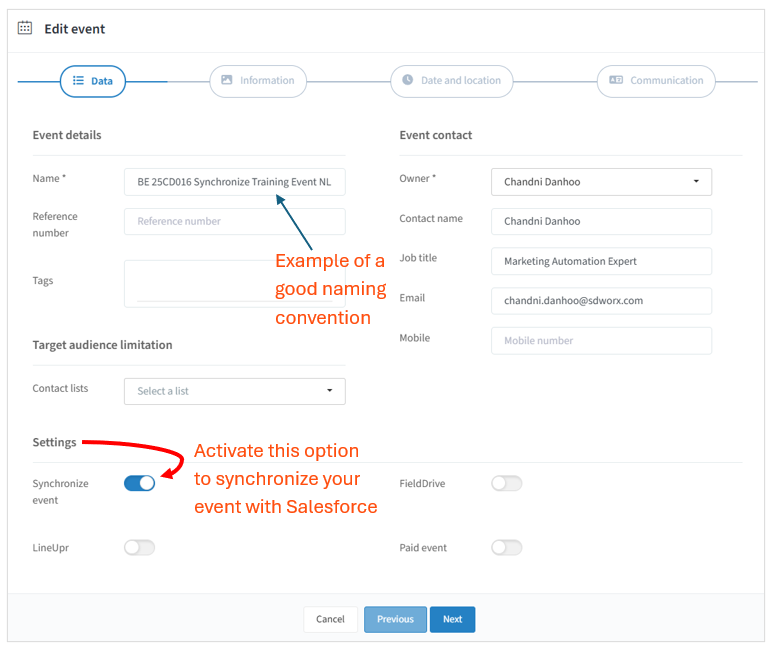
🛠️ Step 1 - Enable the Synchronisation in InviteDesk
In the Data tab, scroll to the bottom left and locate the Settings section.
Toggle “Synchronize event” to activate Salesforce synchronisation. Before you do this, ensure you have used the correct naming convention: This is important because the Salesforce child campaign will inherit this exact name.
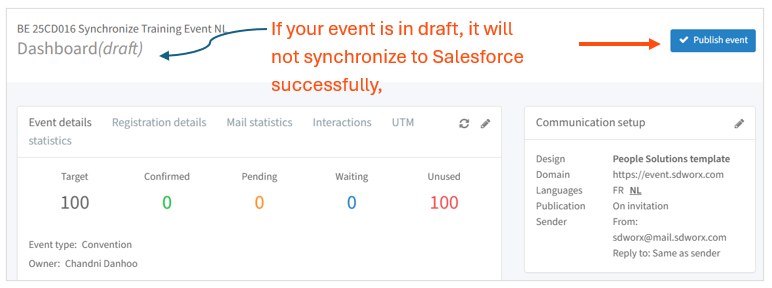
🚀 Step 2 - Publish your event
Click Publish to make your event active.
The synchronisation process will only begin once the event is published.
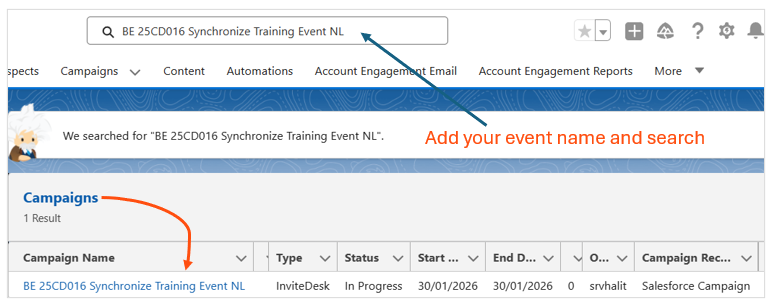
🔁 Step 3 - Wait for the Child Campaign to Auto‑Create in Salesforce
As soon as you activate the synchronisation and publish the event, InviteDesk will automatically create a child campaign in Salesforce using the exact same event name.
This usually takes a few seconds, but may take up to 10 minutes. To locate it in Salesforce, simply perform a quick global search using the event name.
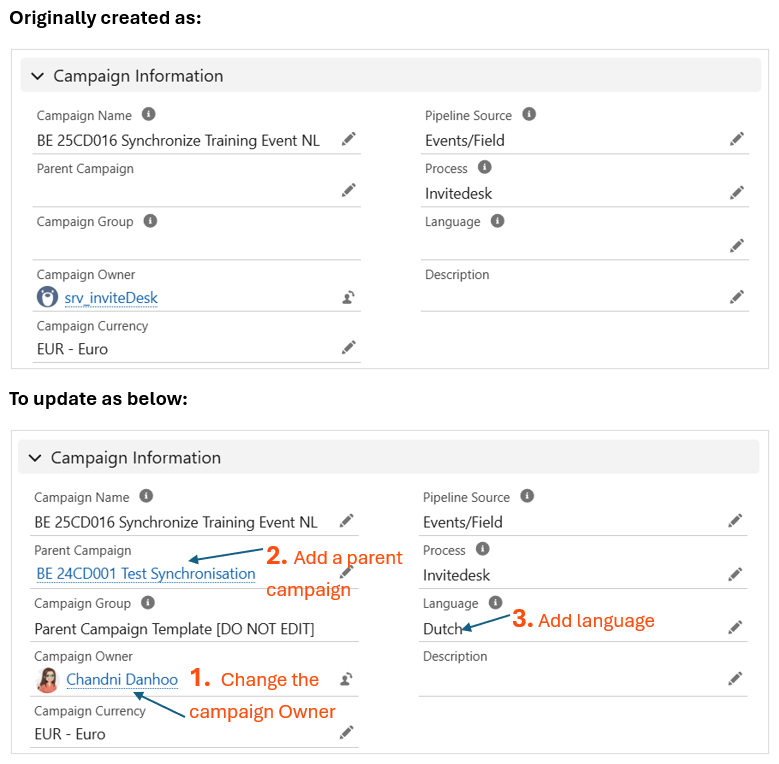
🏷️ Step 4 - Link the Child Campaign to Its Parent Campaign
- Once the child campaign is created, complete the following steps in Salesforce:
- Open the child campaign.
- Change the Campaign Owner from srv_inviteDesk to your own name. This is required before you can update the Parent Campaign field.
- Set the correct Parent Campaign. Linking the parent campaign is essential. It ensures that new leads registering for the event are routed to the correct country lead queue.
✅ Step 5 - Synchronisation Complete
Your event is now successfully synchronised.
The next step is to upload your audience list (Contacts with event preference = true) into the Salesforce child campaign. The contacts will automatically sync to your Invitation List in InviteDesk within a few minutes.
To upload your list, submit a request using this form:
📞 Need Help? Contact Marketing Automation
If you experience any issues during the synchronisation process — whether it's the child campaign not appearing, contacts not syncing, parent campaign linking problems, or anything else — the Marketing Automation Team is here to help.
We’ll support you with troubleshooting, guidance, and ensuring your event is fully synchronised and ready for communication.
How did we do?
Step 6 - Push invitee list to InviteDesk