Creating Campaigns - old
In this article we explain how you can create new campaigns in Salesforce.

About Salesforce campaigns
Any marketing campaign should always consist of a parent campaign and at least one child campaign.
The parent campaign serves as the aggregate of all marketing efforts & channels used in the marketingmix of the campaign.
A child campaign should be created for all channels used in your campaign, and may or may not contain campaign members for the purpose of sending out emails & generating opportunities.
For reporting reasons the following requirements exist:
- A parent should exist with category indication & with indication of total hours spent by marketing team
- A child campaign needs to be created for all out-of-pocket costs in your campaign
- All relevant ads/banners/... should have proper UTM-tags related to this campaign (see article)
- Landing page URL needs to be filled in on the appropriate child campaign
- Naming conventions should be respected as much as possible
Creating a Parent Campaign
- Go to Campaigns tab & select the Templates view

- Select the Template for Parent campaign
- Press the Clone button after clicking the template to make a copy. Be careful not to edit the actual template!

- After creating the clone you can now press edit to start filling in all information about your campaign

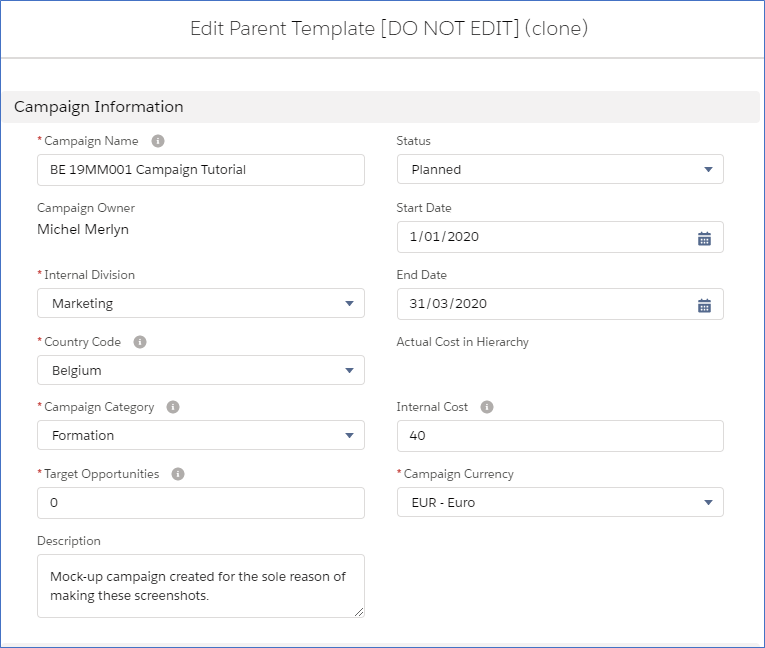
- After clicking edit you arrive at the following input screen

Only fields with a red asterisk are mandatory, but it is advised to fill out all fields.
- Campaign Name: <country code> <campaign code> <descriptive name>
- Country Code: two letters in caps (BE/NL/FR/DE/UK/GS/AT)
- Campaign Code <year> <initials> <counter> (19MM001)
-> Example: BE 19MM001 Campaign Tutorial - Internal Division: what department is running the campaign (Marketing/Learning/Other)
- Campaign Category: indicate the type of campaign
- Market Segment : indicate for which target segment this campaign is
- Target opportunities: indicate how many sales ready opportunities you are aiming for
-> if not an opportunity generating campaign fill in the value 0- Internal cost: indicate (approx.) how many hours was spent by internal marketing team
-> remember to update this value at the end of the campaign!- Campaign Currency - change to GBP for UK campaigns
- Description: always provide context to facilitate future queries
- Status: planned/in progress/completed/aborted
- Start & End Date: used for campaign status calculation (except aborted)
Creating a Child Campaign
- Go to Campaigns tab & select the Templates view
- Select the Template for outbound/inbound/telesales/event/werbinar campaigns
- Press the Clone button after clicking the template to make a copy. Be careful not to edit the actual template!

- After creating the clone you can now press edit to start filling in all information about your campaign

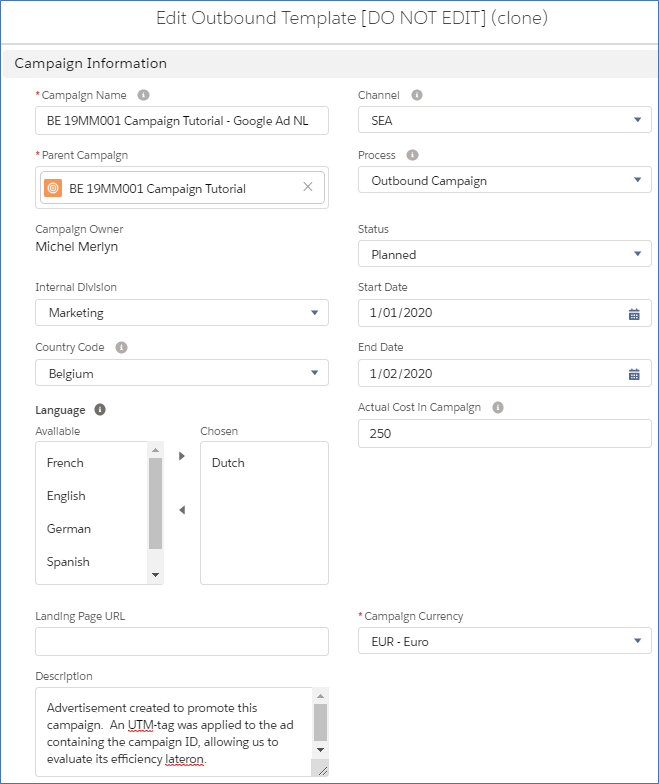
- After clicking edit you arrive at the following input screen:

Only fields with a red asterisk are mandatory, but it is strongly advised to fill out all fields.
- Campaign Name: <parent name> <asset name><language if relevant>
-> example: BE 19MM001 Campaign Tutorial - Google Ad NL- Channel: choose from picklist
- Actual cost in campaign: crucial field for ROI calculation! make sure to create a child campaign for each cost, even for offline channels (f.e. radio commercial)
- Landing Page URL: essential field for your landing page child campaign (leave blank for other channels)
-> example: go.sdworx.com/nl-be/name
- Additionally, you can fill in the fields in the section "Opportunity Info" if you want to give extra information to the SRO's generated via that campaign.
Adding a product
If you want to add a specific product automatically to the SRO's created via your campaign, you can select the right Price Book, Product, Quantity (1) and Product Sales Price (should be 1 or more).
Opportunity close date
You can also overrule the 'Estimated close date' for the SRO by filling in the 'Default Close days' field. By default this will be 14 days after the creation date.
Opportunity owner
By default, the account owner will be the opportunity owner of the SRO's generated via your campaign. If you want to have a specific opportunity owner, you can select the user that should become owner of the SRO's generated via this campaign.
Sales script
The information in the sales script will be transferred to the opportunity description field so you can fill in the instructions for sales for follow up here.

How did we do?
