Table of Contents
How to Create a Webinar in GoToWebinar
A Step-by-Step Guide for Webinar Organizers! In this article, you'll learn how to create a webinar in GoToWebinar, including choosing the right format, setting up the event details, and assigning roles.

A Step-by-Step Guide for Webinar Organizers! In this article, you'll learn how to create a webinar in GoToWebinar, including choosing the right format, setting up the event details, and assigning roles. If you're new to GoToWebinar, we recommend starting with [Article 1: Getting Started with GoToWebinar] for an overview of user accounts, webinar types, and roles.
🧩1. Schedule Your Webinar
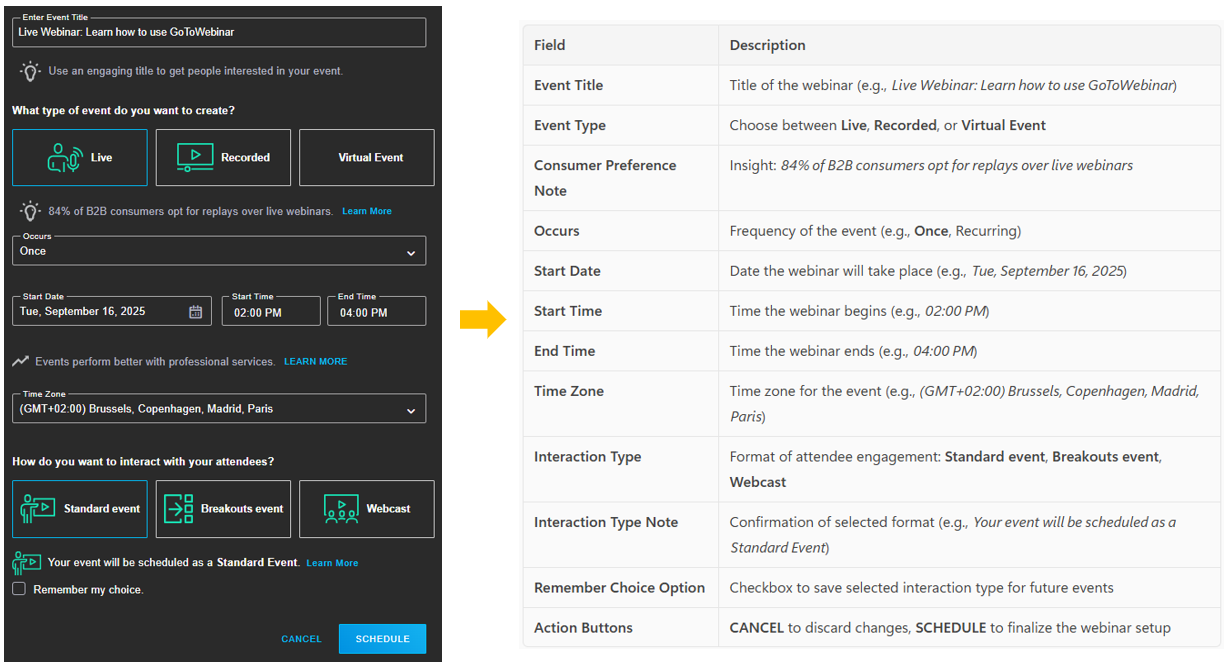
Creating a webinar starts with defining the essentials:
- Log in to GoToWebinar and click “SCHEDULE +” found at the right of the dashboard.
- Enter your event title (e.g., Live Webinar: Learn how to use GoToWebinar).
- Choose your event type: Live – Real-time interaction with attendees / Recorded – Pre-recorded session for on-demand viewing / Virtual Event – Multi-session format for larger events.
📅 2. Set Date, Time & Time Zone
- Choose whether the event occurs once or is recurring.
- Set the start and end date/time. Select the appropriate time zone to match your audience.
🕒 Example: Tuesday, September 16, 2025 – 02:00 PM to 04:00 PM (GMT+02:00 Brussels)
👥 3. Choose Interaction Format
Select how attendees will engage with your webinar:
- Standard Event (default) – Full interaction with Q&A, polls, and handouts; Breakouts Event – Enables smaller group discussions; Webcast – View-only format for large audiences.
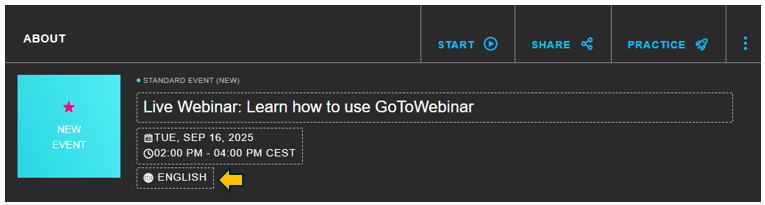
- Once you have "SCHEDULE" the event, you can review/update the webinar details and add a Description of the event.
- Select the language of your Webinar Event. All communication will be translated according to the selected language
- Always add "SD Worx Webinars" as a co-organizer
👉 Check out [Article 1: Getting Started with GoToWebinar] for a complete overview.
- Review the "SETTINGS".
🎯 4. Update Branding & Colors
- Update the "BRANDING & COLORS":
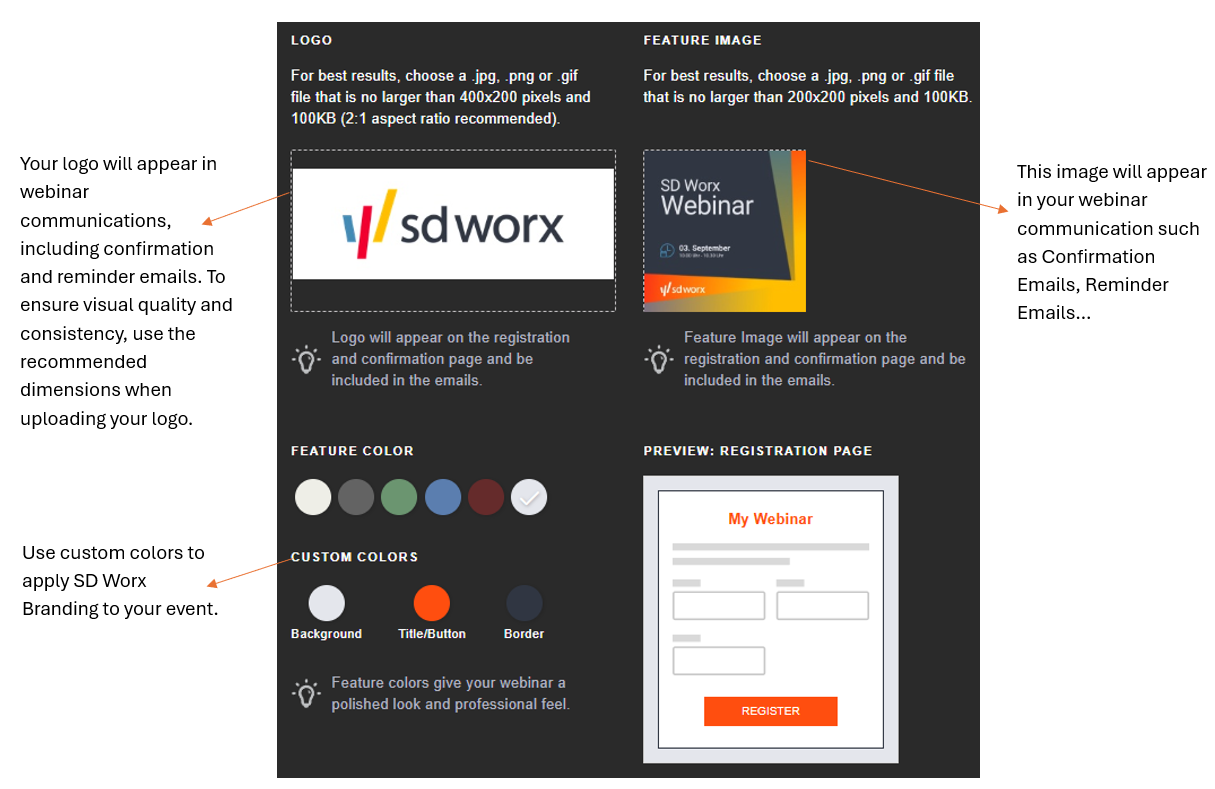
Update Feature Color with custom color which aligns with SD Worx Brand.
📧 5. Emails - Confirmation & Reminder
- In the "EMAIL" tab, update the "Confirmation Email to Registrants" and "Reminder Email" in GoToWebinar. Note that Follow-Up emails should be prepared on Pardot.
✅ Confirmation Email to Registrants
Enable it: This email should be activated to automatically send a confirmation to attendees once they register.
Purpose | Timing | What to include | Why it matters |
Confirms registration Provides access details | Immediately after registration | Webinar title, date, and time Join link (auto-generated) Add-to-calendar buttons Contact info for support | Confirms successful registration Reduces confusion and support queries Encourages attendees to save the date |
⏰ Reminder Email
Enable it: This email helps ensure registrants don’t forget the event.
Purpose | Timing | What to include | Why it matters |
Reminds registrants to attend the webinar | 1 or 1+ Day / Week / Hour before You can send up to 3 reminders | Webinar details Join link Last-minute instructions or material | Keeps the webinar top-of-mind Reduces no-shows Allows for last-minute updates |
🕒 Tips for Email Timing
Send Emails Early in the Week
✔️ Best days: Tuesday or Wednesday for higher open rates.
❌ Avoid Mondays and Fridays : Lower engagement due to busy schedules or weekend prep.
Optimal Time of Day
✔️ Aim for 10–11 AM when recipients are settled into their workday.
📋 6. Webinar Registration Assets (Form, Page, Emails)
The registration form, landing page, invitation email, and follow-up emails should all be created in Pardot to ensure proper tracking and engagement.
If you need assistance, the P&A Team is available to support you in building these assets.You can easily submit your request using the following link: http://www.sdworx.com/requestform
🛑 Common Mistakes to Avoid When Creating a Webinar
Mistakes to Avoid | How to fix? |
1. Choosing the Wrong Event Type ❌ Mistake: Selecting "Recorded" when you intend to interact live with attendees. | ✅ Fix: Double-check your event type—Live for real-time interaction, Recorded for on-demand, and Virtual Event for multi-session formats. |
2. Incorrect Time Zone ❌ Mistake: Scheduling the webinar in the wrong time zone, leading to confusion or missed attendance. | ✅ Fix: Always confirm the time zone matches your target audience’s location. |
3. Forgetting to Update Branding ❌ Mistake: Leaving default branding, which can reduce trust and engagement. | ✅ Fix: Upload a branded image (max 400x200px, under 100KB) to personalize your registration and confirmation pages. |
4. Not Setting Up Registration Properly ❌ Mistake: Using GoToWebinar’s default registration instead of Pardot. | ✅ Fix: Create registration forms, landing pages, and emails in Pardot for better analytics and engagement. |
5. Skipping Email Reminders ❌ Mistake: Not enabling reminder emails, causing low attendance. | ✅ Fix: Set up automated confirmation and reminder emails to keep registrants informed. |
6. Overlooking Interaction Format ❌ Mistake: Choosing “Webcast” when you want Q&A or polls. | ✅ Fix: Use Standard Event for full interaction, or Breakouts for group discussions. |
How did we do?
Getting Started with GoToWebinar
Create Webinar Registration Form, Page and Emails in Pardot