Table of Contents
- 📁 1. Create the Webinar Parent and Child Campaign in Salesforce
- 🏷️2. Naming Convention for Webinar Assets
- 🧾3. Create the Webinar Registration Form in Pardot
- 🌐 4. Create Webinar Registration Page in Pardot
- ✉️ 5. Create the Invitation Email in Pardot
- 🔁 6. Create the Follow-Up Email in Pardot
- 🛠️ 8. Additional Best Practices
Create Webinar Registration Form, Page and Emails in Pardot
This guide walks you through the complete setup of a webinar registration flow using Pardot assets and Salesforce, ensuring proper tracking, branding, and engagement from invitation to follow-up.

- 📁 1. Create the Webinar Parent and Child Campaign in Salesforce
- 🏷️2. Naming Convention for Webinar Assets
- 🧾3. Create the Webinar Registration Form in Pardot
- 🌐 4. Create Webinar Registration Page in Pardot
- ✉️ 5. Create the Invitation Email in Pardot
- 🔁 6. Create the Follow-Up Email in Pardot
- 🛠️ 8. Additional Best Practices
This guide walks you through the complete setup of a webinar registration flow using Pardot assets and Salesforce, ensuring proper tracking, branding, and engagement from invitation to follow-up.
📁 1. Create the Webinar Parent and Child Campaign in Salesforce
To track webinar performance effectively, start by creating a Parent Campaign and a Child Campaign for each specific webinar.
✔️ Parent Campaign: Groups all webinars under one umbrella. Create the Parent Campaign using "Parent" template
✔️ Child Campaign: Specific to each webinar. Create the Child Campaign using "Webinar" template.
🏷️2. Naming Convention for Webinar Assets
Use a consistent naming format to keep assets organized and searchable.
Assets | Naming Convention Format Examples |
Salesforce Webinar Parent Campaign | BE 25CD1602 Automation 2025 Webinar NL |
Salesforce Webinar Child Campaign | BE 25CD1602 Automation 2025 Webinar Registration NL |
Pardot Registration Form | BE 25CD1602 Automation 2025 Webinar Registration NL FORM |
Pardot Registration Page | BE 25CD1602 Automation 2025 Webinar Registration NL PAGE |
Pardot Registration List | BE 25CD1602 Automation 2025 Webinar Registration (Responded) NL LIST |
Pardot Invitation Email | BE 25CD1602 Automation 2025 Webinar Invitation NL MAIL |
Pardot Other Emails e.g Follow-up | BE 25CD1602 Automation 2025 Webinar Follow-up NL MAIL |
🧾3. Create the Webinar Registration Form in Pardot
- Create a specific folder for your event in Pardot
- Create a "Responded" Pardot LIST. The purpose of this list is to capture registrants who will fill in the webinar form. This article explains how to create a "Responded" LIST on Pardot: Step 3: Create a responded list - MarTech Academy
Always use Pardot Form Template to create a form:
- Go to Country Folder ➡️ Content Folder ➡️ Example forms (start here for new forms) Folder
- Clone the Form and add the duplicated form to your folder. Ensure your form has a good naming convention and is linked to a Child Campaign that you have created on Salesforce.
- The form should contain the mandatory fields: First Name, Last Name, Email and Company. Check out this article to learn more how to create a form on Pardot: Step 4: Create registration form - MarTech Academy
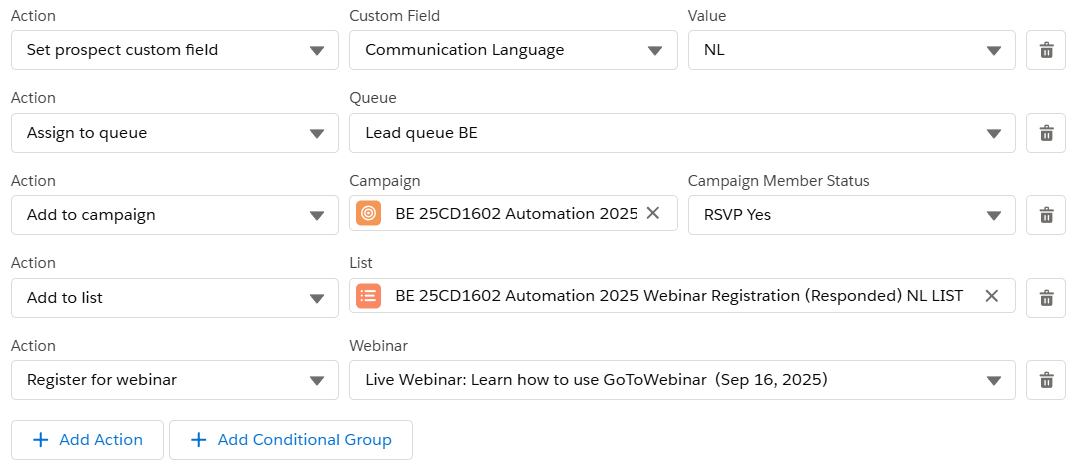
Add the following Completion Action to your form:
✔️ Assign to queue ➡️ Select you Country Lead Queue
✔️ Add to CRM Campaign ➡️ RSVP Yes - Add your webinar Child Campaign
✔️ Add to list ➡️ Add your webinar "Responded" List
✔️ Register for webinar ➡️ Select your webinar you have created on GoToWebinar
✔️ Update the "Thank You Code" with the correct EventCategory: webinar_registration: Conversion tracking of Pardot forms (Google Analytics) - MarTech Academy
🌐 4. Create Webinar Registration Page in Pardot
- In your folder ➡️ Click on Add New button ➡️ Landing Page
This article explains how to create a Landing Page in Pardot: Step 6: Create Landing Page - MarTech Academy
- Link your Child Campaign to the Landing Page and use a clean vanity URL like: https://go.sdworx.com/nl-be/automation-webinar
- Add the registration form.
- Use/Select the layout template according to your campaign requirements
- Add your event details and speaker info in your page.
✉️ 5. Create the Invitation Email in Pardot
This article covers all the steps for creating an email on Pardot: Training - MarTech Academy
- Link the Email to Your Child Campaign
- Ensure your email has a good naming convention
- Additionally, We’ll soon be implementing a dedicated webinar invitation email template that includes all the essential design blocks—such as speaker sections, agenda highlights, and CTA buttons—to streamline your setup and enhance engagement.
📩 Consideration when sending a webinar Invitation Email:
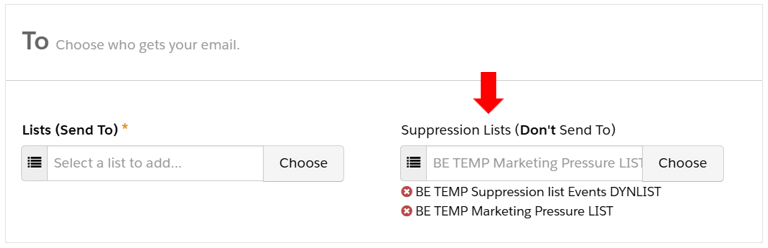
🔴 Use the “Event” Suppression List
Make sure to add the Event suppression list to your main invitation email. This ensures that prospects who haven’t opted in to receive event or webinar communications are automatically excluded from the send. It helps maintain compliance and improves targeting by reaching only those who are interested.
🔁 6. Create the Follow-Up Email in Pardot
Follow-up emails are essential to keep registrants engaged after the webinar. A common example is a Thank You Email that includes a recording link, additional resources, or a feedback survey.
🎯 Wondering how to target only those who attended your webinar in Pardot?
Step 1. Create the List
Create your list in the your Campaign Folder. To add specific target to your list for example: Attendees,
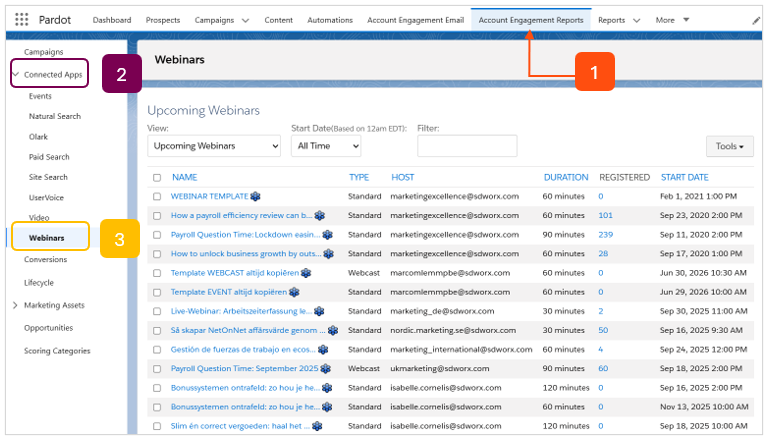
- Go to Account Engagement Reports (Pardot) ➡️ Connected Apps ➡️ Select Webinars
- Once you select "Webinars", You’ll see a list of upcoming and past webinars with details like: Name, Type, Host, Duration, Start Date.
- Filter by Attendance Status: Attended / Absent / Invited / Accepted by Organizer / Rejected by Organizer / ...
- Select the filtered audience.
- Add them to the list you created in Pardot. Use this list to send your follow-up email.
Step 2. Update the Status in Salesforce after the Webinar
Keeping your Salesforce campaign member statuses up to date after a webinar is essential for accurate reporting and follow-up. This also allows you to prepare your sending lists for the webinar after care emails. Click on the button below to learn how to update Member Status in Salesforce
Step 3. Create the follow-up Email
Creating an email is easy, but a highly performing one. This article explains how to create an Email form scratch in Pardot: Step 4: Creating an email - MarTech Academy
📩 Key Considerations Before Sending a Webinar Follow-Up Email
Follow-Up Emails (e.g., “Thank You” Emails):
🔴 These types of emails do not require a suppression list. Since they are service-related (such as thanking attendees) and not promotional, checking for opt-in status is not necessary. These emails are directly related to an action the recipient has taken—such as registering for or attending a webinar, hence you are allowed to follow up without needing explicit marketing consent.

🛠️ 8. Additional Best Practices
Key points | |
✅ Testing and QA Checklist |
|
✅ Syncing with Salesforce | Ensure registrants sync to the correct Salesforce campaign member status. |
✅ Reporting and Metrics | Use Pardot reports and Salesforce dashboards to track:
|
✅ UTM Tracking | Add UTM parameters in your Emails for better tracking. |
How did we do?
How to Create a Webinar in GoToWebinar
Update campaign member status to "Attended/NoShow" after the webinar