Step 4: Creating an email
Training Email Step 1: The basics Step 2: Navigating through Pardot, Folders and Campaigns Step 3: Creating lists Step 4: Creating an email Step 4b: Completing the email Step 5: Sending the email Cre…

Updated
by Matthew Smet
Training Email | |||||
Step 4: Creating an email |
Creating an email is easy, but a highly performing one. That is a project in itself. For now, we will just focus on creating an email!😉
Creating a Email
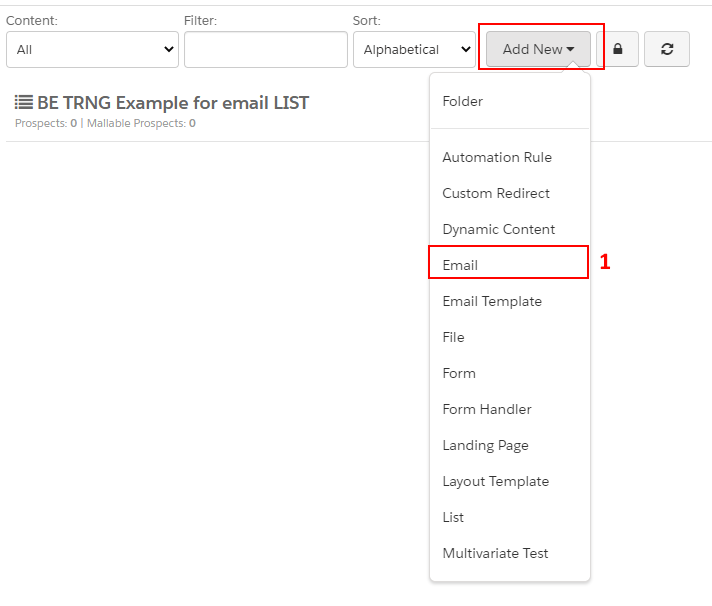
- In the same folder where you created your list and performed prevouis steps. Click on "Add new" and go to Email.

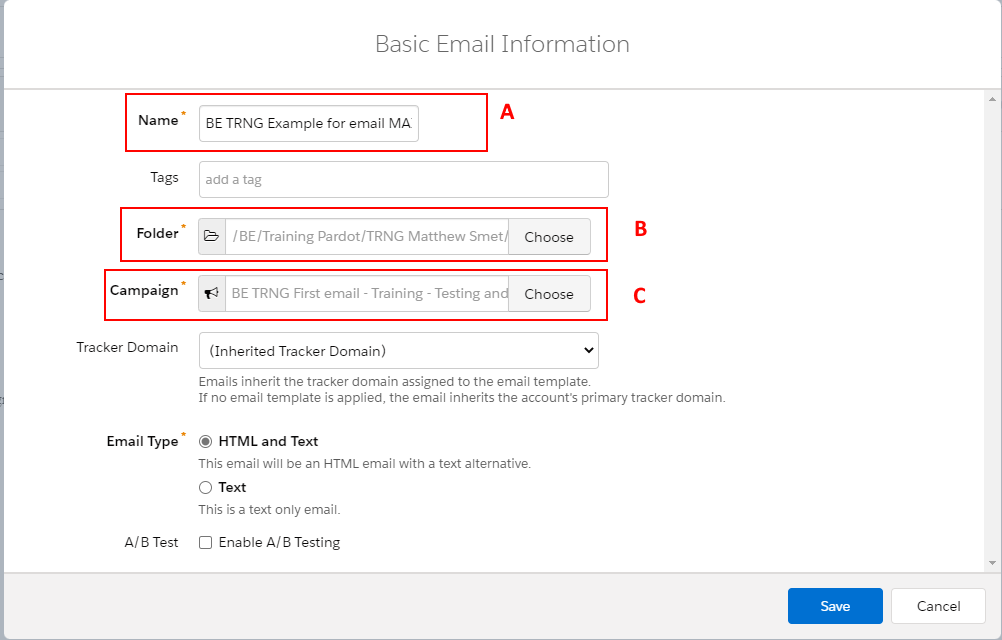
- This will prompt up a new window to fill out the basic email information first.
- Name, choose the right naming convention to describe the email.
--> [Country-code] [Campaign-code] [Description] [Language] [Asset-Name (3 to 4 letters)]
Example: BE TRNG Example for email NL MAIL - Folder, If you do not followed step 1 in the folder you want to have the email. Select the corrosponding folder.
- Campaign, Select the campaign where you want to connect the email too. This is important for reporting! For this course, select the campaign you created in Step 2: Navigating through Pardot, Folders and Campaigns.
- Name, choose the right naming convention to describe the email.

- Choose your template that you want to apply.
Each country has a standard 4 types of templates + additional ones depending on the needs from the Marketing team. For countries with multiple languages choose the template with the right language.
- 2 basic templates with the difference in the header width (above the fold), a full width header (600px) and a 2 column header (1 column with the title and 1 column with the header image 288px)
- 2 templates with all the available components
- Newsletter template (depending on country)
- ...

- Adjust your email to your liking. We describe how to change certain types of items in this article: Step 4b: Completing the email.
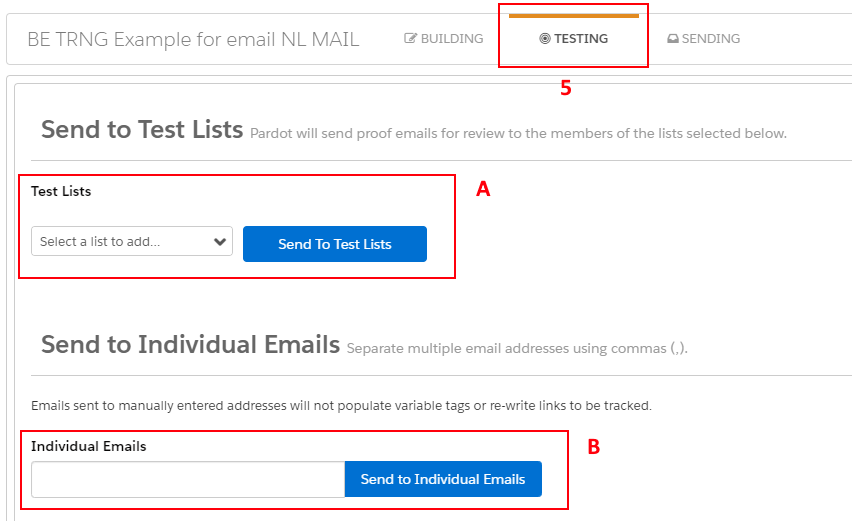
- When your email is complete, it is time to test the email out! Go to tab "Testing".
- Select your Test list and click on "Send to Test Lists". You do not have one? Create your own Test list here.
Test emails are always indicated with "Proof - [Subject]" in the emails subject line and links have an in-between window with a statement saying you will be redirected after 5 seconds and you are not cookied for this session. - Send to individual Emails will not send out a test email based on your profile. It just sends an HTML version and Text version of the email like you see in the editor. No dynamic content or other things are filled in. Best always utilize option A: Send to Test lists.
- Select your Test list and click on "Send to Test Lists". You do not have one? Create your own Test list here.

How did we do?
Step 3: Creating lists
Step 4b: Completing the email
