Step 3: Creating lists
Training Email Step 1: The basics Step 2: Navigating through Pardot, Folders and Campaigns Step 3: Creating lists Step 4: Creating an email Step 4b: Completing the email Step 5: Sending the email Lis…

Updated
by Matthew Smet
Training Email | |||||
Step 3: Creating lists |
Lists are a collection of contacts that we can utilize to send them targeted emails, put them in a nurturing track, supress them from receiving emails, ... or even capture their response on an asset.
Key things to keep in mind
- Lists can be populated from selections by List management on Salesforce campaigns
- List can be populated by certain actions within Pardot assets (like landing page submissions, email clicks, or other triggers)
- Lists can be utilized to supress people from receiving certain emails or Pardot actions.
Creating a list
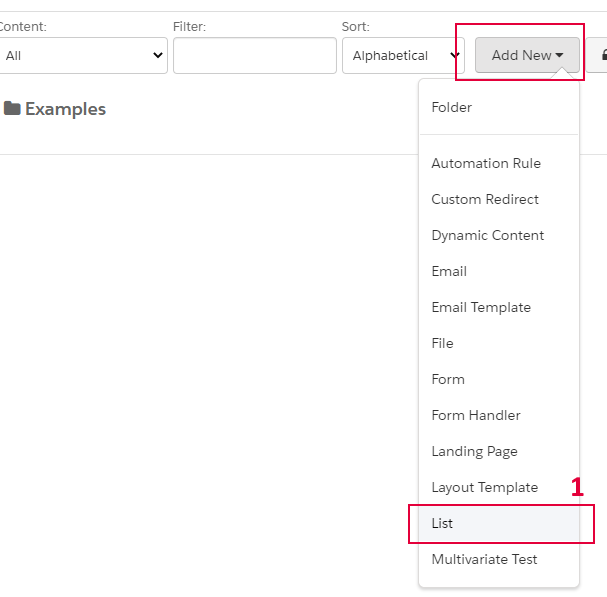
- In your just created folder (see previous chapter), proceed with the steps. Click "Add new" and select List.

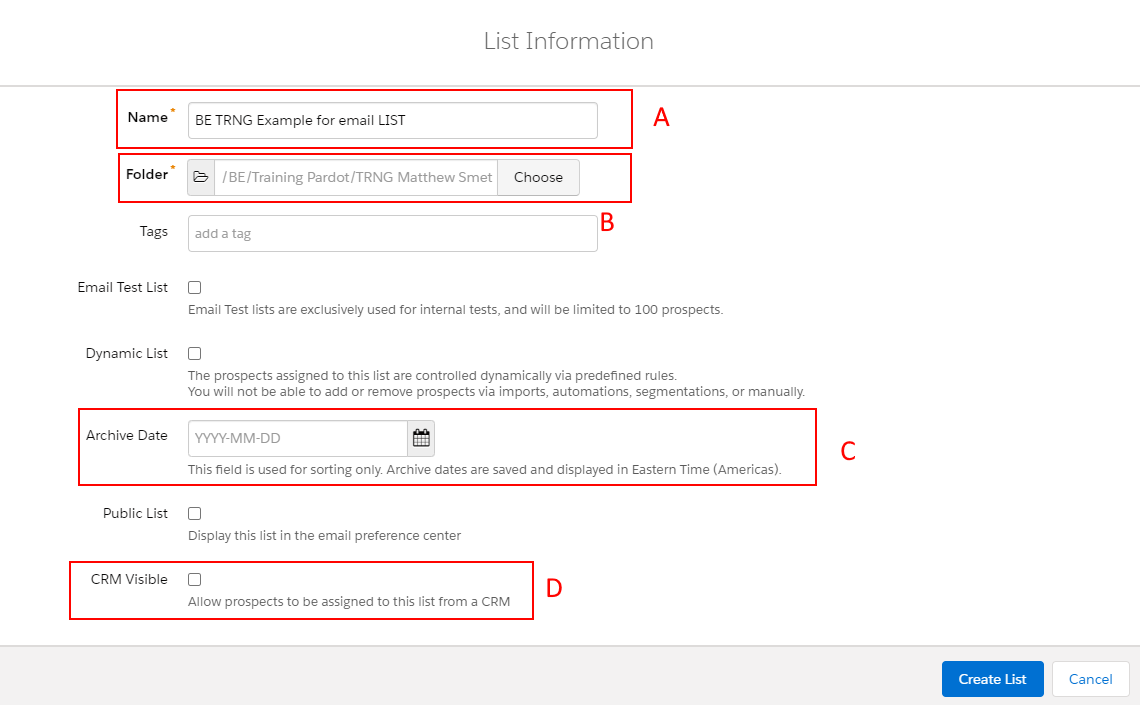
- It will prompt a pop-up window which you then can name and configure the list.
- The name of the list. Remember our naming convention!
--> [Country-code] [Campaign-code] [Description] [Asset-Name (3 to 4 letters)] - It should automaticly allocate it to the right folder where you added the list to. Wrong folder? Click "Choose" and navigate to the folder you want to create it in.
- We always choose an archive date! This does NOT delete the list. It only hides it from dropdowns after the date has passed.
- CRM visible, sometimes List management will prepare a selection on a Salesforce child campaign you created. Those contacts are not automaticly transferred from Salesforce to Pardot. You will need to manually push and map them to the right list. If this is the case, you can check the box!If this checkbox "CRM Visible" is not marked. The list won't appear in Salesforce.

- The name of the list. Remember our naming convention!
- Click on Create list!
Pushing Campaign contacts to Pardot lists
When you created your list and have a selection of contacts ready-to-go on your child campaign. Navigate to the child campaign and press the button. Add to Pardot list. This will open up a new window.

- Salesforce campaign, will give you an overview of the campaign where you are going to puhs contacts from. The number of members is depicted behind the campaign name.
- List Action, has 2 options, Add to an existing Pardot list (which we ALWAYS use!) and create a new pardot list (which we NEVER use). Choose the option: Add to an existing Pardot List.
- Pardot List, choose the list you created. Tip: it will be at the bottom of the dropdown list.
- Campaign Action, needs to remain on "Add to an existing Pardot campaign".
- Pardot campaign, choose the Salesforce campaign where you began are pushing the list from.
- Override existing Pardot campaign, simple. NEVER check this!
- You are ready to go, you can push the items to your Pardot list!
Always wait on the confirmation email from Pardot before you utilize the list in any way. It has the danger of missing out on contacts if you send prematurely.

How did we do?
Step 2: Navigating through Pardot, Folders and Campaigns
Step 4: Creating an email
