Table of Contents
- Foleon Key Differences Summarized:
- Step 1 - Choosing Your Template for your Foleon Doc
- Comparison of available templates
- Step 2 - Structure Your Content with Page Templates
- Best practices
- Step 3 - Add elements in Foleon pages with Block Templates
- How to add a Block to your page?
- How to add an Element to your Block
3. Create Foleon Doc & Pages from a Template
Creating visually engaging and structured content is easy with Foleon templates functionality. Whether you're building a brochure, report, whitepaper help you get started quickly and maintain consist…

- Foleon Key Differences Summarized:
- Step 1 - Choosing Your Template for your Foleon Doc
- Comparison of available templates
- Step 2 - Structure Your Content with Page Templates
- Best practices
- Step 3 - Add elements in Foleon pages with Block Templates
- How to add a Block to your page?
- How to add an Element to your Block
Creating visually engaging and structured content is easy with Foleon templates functionality. Whether you're building a brochure, report, whitepaper help you get started quickly and maintain consistency. This guide walks you through how to create a Foleon Doc using templates and structure it using page templates with blocks and elements.
Foleon Key Differences Summarized:
👉 Foleon Doc: The entire publication or content piece. A Foleon Doc can consist of multiple pages.
👉 Page: A single, distinct section within a Foleon Doc, serving as a canvas for content. Just like pages in a traditional document.
👉 Block: A horizontal container that structures the layout of a Page, holding columns and elements.
👉 Element: The smallest, most granular unit of content (text, image, button, etc.) that goes inside a column within a block.
Step 1 - Choosing Your Template for your Foleon Doc
Begin your content creation process by selecting a pre-designed foundation.
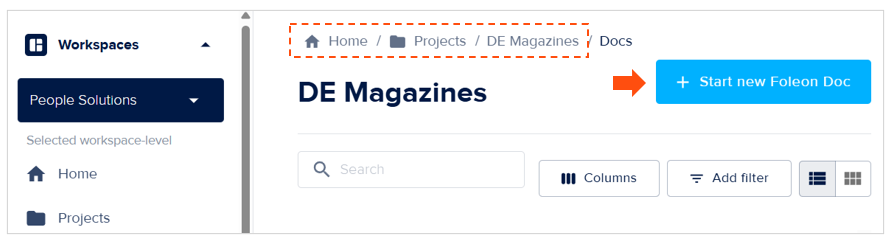
- Log into your Foleon account & Go to your country project [Alias folder]: Select the right folder.
- Create New Document: Select the "Create New Foleon Doc" option.
Assign your new Doc to a relevant project and give it a clear, descriptive title.
🟥 Name your Foleon doc in the "General information": 2. Naming Conventions: A Guide for Foleon - MarTech Academy
🟥 Select the project folder in "Project" section: 3. Foleon Folder Organisation - MarTech Academy
- Choose a Template: Browse the template library and select a template that aligns with your content's objective (e.g., "NO template Onepage", "Transport your talent strategy (template) ", "Tailoring worksplace flexibility (template)").
- Save your Foleon Doc: Confirm your selection to open the document in the Foleon Content Builder.
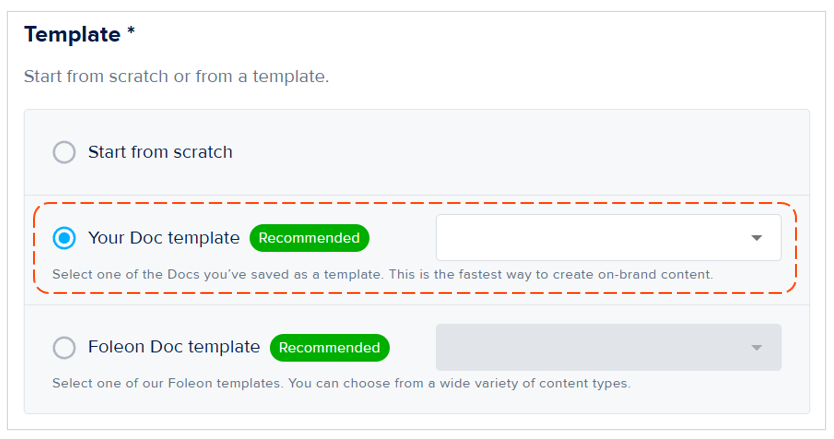
It is highly recommended to use the "Your Doc template" option to ensure SD Worx brand consistency, for rapid content creation, to streamline workflow efficiency and having quality and professional content. This option provides access to a library of professionally designed templates created by Foleon. These templates are versatile and cover a wide variety of content types and industries.
Comparison of available templates
Template | Start from scratch | Foleon Doc template | Your Doc template |
Description | This option provides you with a completely blank canvas. There are no pre-designed layouts, pages, or content. | This option provides access to a library of professionally designed templates created by Foleon. These templates are versatile and cover a wide variety of content types and industries. | This recommended option allows you to select from Foleon Docs that you (or someone in your Foleon workspace with the appropriate permissions) have previously saved as templates. These are essentially copies of existing Foleon Docs that have been designated according to branding for reuse. |
Step 2 - Structure Your Content with Page Templates
Templates provide structured page layouts. You can add, remove, or rearrange these to form your narrative.
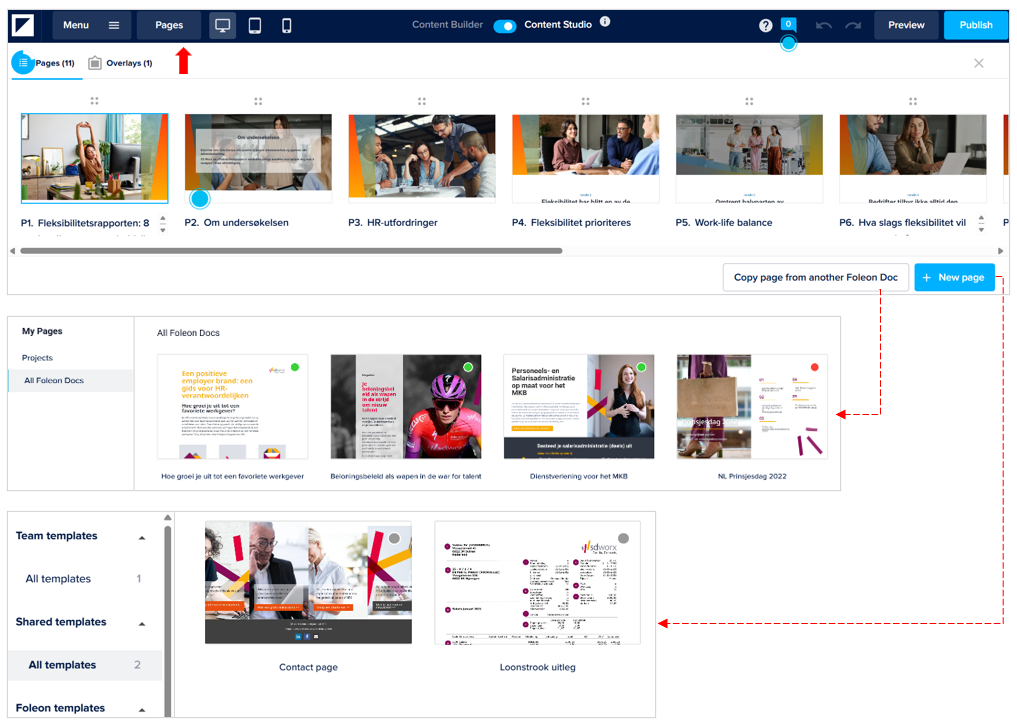
- Navigate to Page Overview: Access the "Pages" section within the Content Builder.
- Option 1: Add a New Page: Click the "+ New Page" button.
- Option 2: Duplicate an existing page: Copy page from another existing Foleon Doc
Best practices
Start with Our Predefined Templates: When initiating any new Foleon Doc, always select the "Your Doc template" option. This ensures that every piece of content begins with our approved branding, layouts, and pre-configured elements.
Eliminate Redundancy: Avoid building similar Docs from a blank canvas. If a template exists for your content type, use it to save significant time and effort.
Utilize Pre-set Elements: Make full use of the existing sections, text placeholders, image slots, and interactive elements within the template. These have been designed for optimal presentation and user experience.
Maintain Brand Integrity Within Templates: Our predefined templates are built using our central Brand Kit. Trust that the colors, fonts, and logos are already correctly applied. Avoid manual color or font changes unless explicitly instructed for specific, approved variations.
Identify Gaps: If you frequently find yourself needing a new layout, a specific type of block, or a completely new template that doesn't exist, provide constructive feedback to the template management team.
Step 3 - Add elements in Foleon pages with Block Templates
So you've chosen your Foleon Doc template, and now you're ready to bring your content to life! Think of a Foleon page as a canvas, and Blocks and Elements as the essential components you use to paint your digital story. This guide will walk you through populating your pages with engaging content, leveraging Foleon's intuitive drag-and-drop interface and powerful template options.
How to add a Block to your page?
- Select Your Page: In the Foleon Content Builder, ensure you are on the specific page where you wish to add a block.
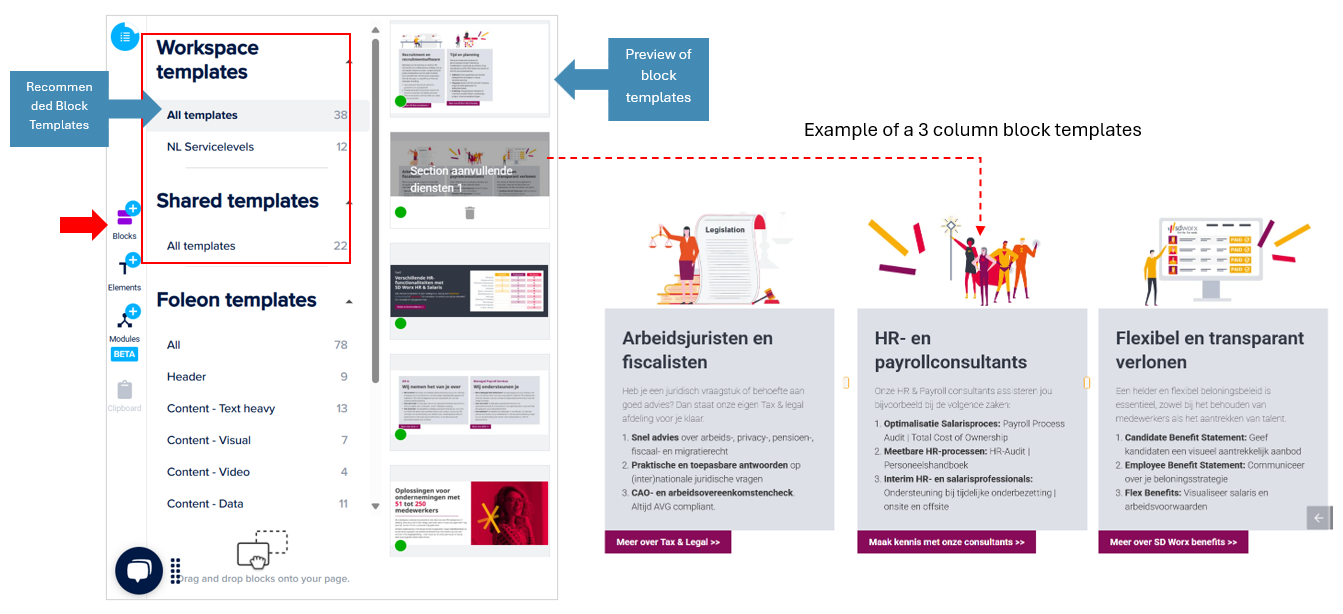
- Access the Blocks Panel: On the left-hand sidebar, click the "+ Blocks" icon. This will expand the panel displaying "Workspace templates," "Shared templates," and "Foleon templates."
- Choose Your Block Template: Navigate through the categories and sub-categories to find the block that best suits your content's structure. It is recommended to use the Workspace templates or Shared templates.
- Drag and Drop: Click and drag your chosen block template directly onto your page. A blue indicator bar will guide you, showing where the block will be placed. Release your mouse to confirm the placement.
- Manage and Reorder Blocks: Once placed, a purple settings bar appears on the block. Use the four-dot icon (handle) to drag and reorder blocks vertically on your page. The settings bar also allows you to duplicate, save your modified block as a "Workspace template," or delete it.
Block Categories
Type | Workspace templates | Shared templates: | Foleon templates |
Description | Recommended - These are SD Worx custom-built and saved block templates. They are specifically designed to align with brand's layouts, and content requirements. They guarantee brand consistency across all your Foleon Docs, significantly speed up content creation for recurring sections, and embed SD Worx specific design and functional best practices. | Recommended - Similar to Workspace templates, these are SD Worx custom blocks that have been made available across different teams or workspaces within your Foleon account. They facilitate collaboration and broad adoption of specific content modules. | This is Foleon's extensive library of professionally designed, versatile block templates. They are categorized for easy navigation (e.g., "Header" for intros, "Content - Text heavy" for articles, "Content - Visual" for image galleries, "Content - Video"...). |
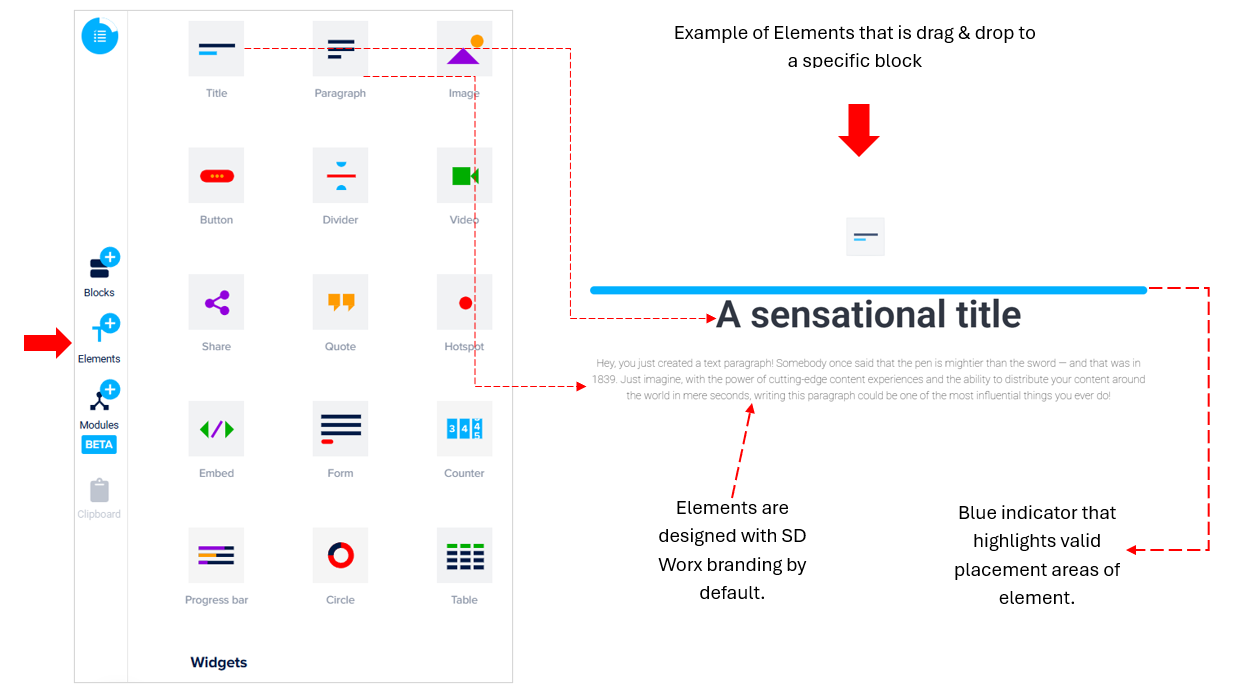
How to add an Element to your Block
- Target a Block: Ensure you are focused on the block where you want to add an element.
- Access the Elements Panel: On the left-hand sidebar, click the "+ Elements" icon. This panel displays all available element types.
- Choose Your Element Type: Select from options like "Title," "Image," "Video," "Button," "Paragraph," "Embed," "Divider," or "Progress bar."...
- Drag and Drop: Click and drag your chosen Element from the panel directly into your block. A blue indicator will highlight valid placement areas within the block's layout.
Element Options
Elements | |||||
 Titles: Used for headlines and subheadings. |  Paragraph: For the main body of your text. |  Quote: To highlight statements. |  Image: For adding images (jpg,png...) |  Video: Embed videos from platforms like YouTube,Vimeo.. |  Table: For presenting structured data. |
 Hotspot: to reveal more information, link to content, or trigger other actions. |  Button: Call-to-action that can link to internal pages, external URLs. |  Embed: This allows you to embed external URL into your Foleon Doc. |  Counter: Animates a count-up to a specified value. |  Progress Bar: Visually shows progress towards a goal. |  Circle: A donut chart-like element to display data. |
 Divider: A simple line element used to visually separate content sections |  Carousel: Displays a series of images or content slides. |  Gallery: Presents a collection of images in a grid. |  Salesforce Pardot: To display a form that is created within Salesforce. Learn more |
How did we do?
2. Foleon Folder Organisation
4. Embedding Pardot Forms in Foleon: 3 Flexible Options