Create Solution Forms for Domain and Solution Pages
Key Guidelines for Field Marketers. Use the provided Pardot Solution form templates for the respective countries.. Follow the naming conventions and campaign structure accurately.. Ensure correct imp…

Key Guidelines for Field Marketers
 Use the provided Pardot Solution form templates for the respective countries. Use the provided Pardot Solution form templates for the respective countries. |
Follow the naming conventions and campaign structure accurately. |
|
Ensure correct implementation and embedding of forms in Drupal pages. |
Coordinate with Marketing Automation for updates / governance. |
Step-by-Step Guide: Pardot Form Creation to Drupal Embedding
Step 1: Create Salesforce Campaigns
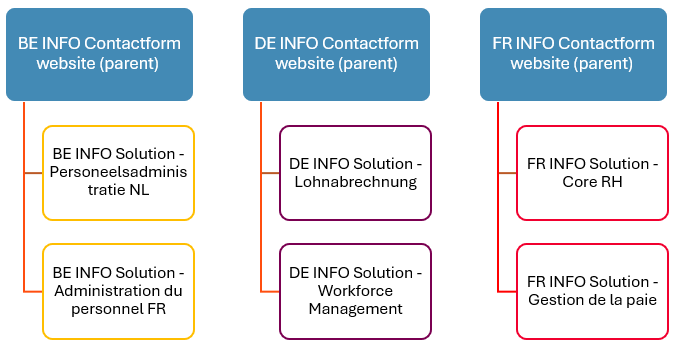
The solution or domain form needs to be associated with a Parent Campaign and a Salesforce Child Campaign.
Parent Campaign
Always use the default existing Contactform parent campaign for each country.
Child Campaign
It is mandatory to have a domain specific solution form & child campaign for each country. Create the solution and domain child campaign with the following naming convention format:
| Campaign Type | Naming Convention Format |
|---|---|
| Child Campaign | [Country code] INFO Solution - [Domain] [Language] |
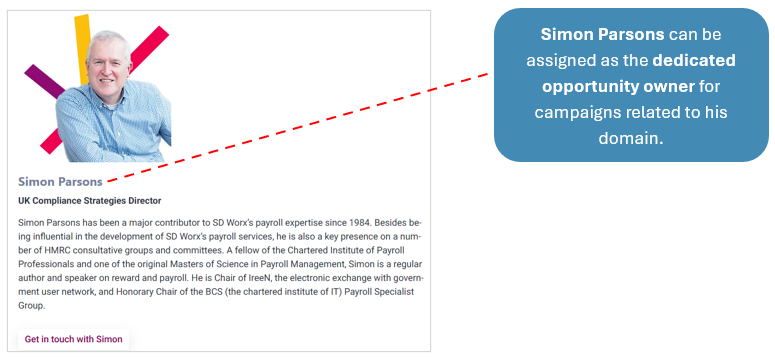
Follow-Up Assignment: Dedicated Opportunity Owner (Optional)
Assigning a Dedicated Opportunity Owner in the campaign setup helps ensure timely and informed lead follow-up. This is applicable when a specific person has subject matter expertise related to the solution. For specific expertise: If a solution sub-domain page has specific owner / experts, for example: For specific expertise: If a domain/solution page has specific need of follow-up on leads:
Benefits of Having a Dedicated Opportunity Owner
 Ensures fast and qualified follow-up with leads. Ensures fast and qualified follow-up with leads. |
Aligns marketing and sales around specific solutions and ownership. |
|
Improves conversion rates by reducing hand-off delays. |
Provides a better customer experience by connecting prospects with the right expert. |
|
Supports campaign reporting and accountability—clearly shows who followed up and when. |
Step 2: Create Solution and Domain Forms
Access the Pardot Form Templates
Each country will have their specific solution and domain form template.
- On Pardot ➡️ Go to:
Country Folder ➡️ Content Folder ➡️ Example forms (start here for new forms) Folder
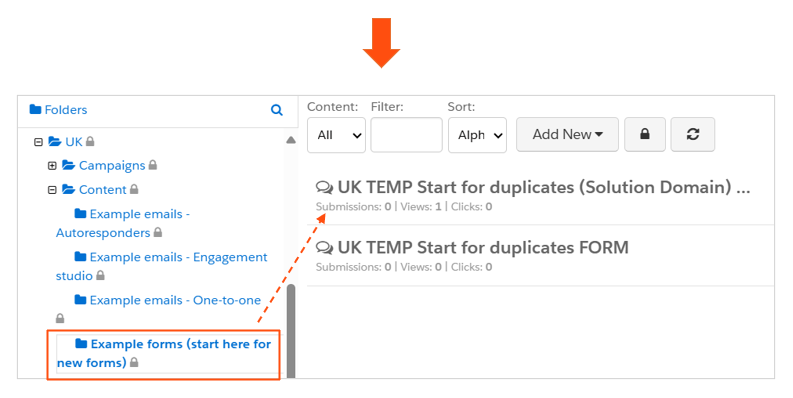
- Select the relevant Country Solution Domain Form template.
- Copy / Duplicate the Solution Domain Form Template to start your form.
- Rename the form using the following Naming Convention Format:
| Pardot Asset | Naming Convention Format |
|---|---|
| FORM | [Country code] INFO Solution - [Domain] [Language] FORM |
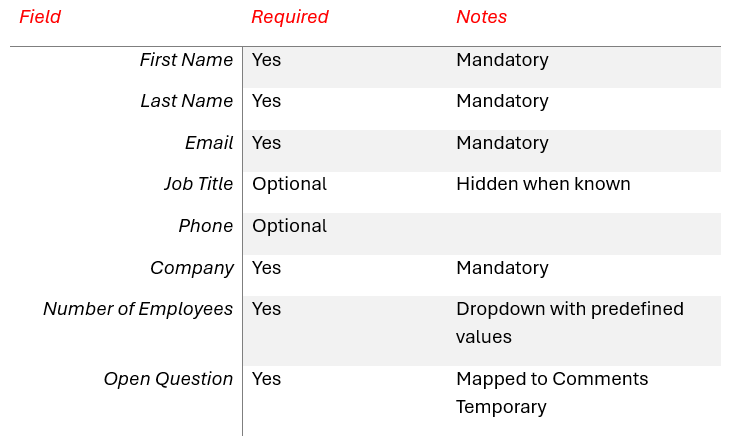
- Configure & ensure it has the following form fields.
- Configure the form completion action.
- Update conversion code and add a thank you message or redirect thank-you URL.
Step 3: Create the Pardot iframe Page
- Create a new Pardot Landing Page to host the form in an iframe.
- Add the Pardot Solution or domain form in this iframe page.
- Select the specific country iframe template & Save and publish.
- Copy the URL of the iframe page — you will need it for the Drupal embed.
Step 4: How to Embed the Solution and Domain Form on the Drupal Solution Page
- Log in to your Drupal CMS.
- Navigate to the solution sub-domain page where the form needs to be added.
- Add a new content block in the appropriate section.
- Paste the following iframe code, replacing Pardot_URL with your iframe page URL:
<iframe src="Pardot_URL" frameborder="0" width="100%" height="1300"
scrolling="auto" class="iframe-utm"
onload="addIframeUtmParameters();"></iframe>
Step 5: Perform Final Testing
- Test form submission: verify that the data is captured correctly in Pardot and synced to Salesforce.
- Mobile and cross-device check: Ensure the form displays correctly on desktop, tablet, and mobile.
- Validate redirect or thank-you message works.
You're Done! ✅ 
 Best practices and considerations
 Each solution domain must have its own unique form. Adhere to naming conventions strictly to avoid confusion. Always use the Solution Domain Form Template in Pardot. Keep templates updated and track changes/versioning as needed. Marketing Automation governs the Pardot form templates and manages all updates on templates. Thank-you message or redirect URL functions correctly. Ensure mobile responsiveness and confirm alignment and formatting on all major screen sizes. Perform form submission tests in staging before publishing.
How did we do?
Push prospects from a Pardot list to another
Creating an MQL/Opportunity from a Campaign