Push prospects from a Pardot list to another
This article -describes how to add prospects from one Pardot list to another within Pardot. It also defines the process of segmenting webinar leads and email leads to a Pardot list, according to diff…

This article -describes how to add prospects from one Pardot list to another within Pardot. It also defines the process of segmenting webinar leads and email leads to a Pardot list, according to different statuses such as webinar attendees / Absentees, email opens / clicks.
This process is useful when:
👉 You need to add a batch of prospects to another Pardot list to send an email.
👉 You need to segment webinar leads from GoToWebinar tool and add to a Pardot List-
👉 You need to add a list of prospects to an automation e.g. nurture flow [after approved by the marketing automation team]
Push a Pardot prospect list to another Pardot list
Step 1 – Create a list on Pardot (to which the prospects need to be added)
Follow this MarTech article to learn how to create a list on Pardot.
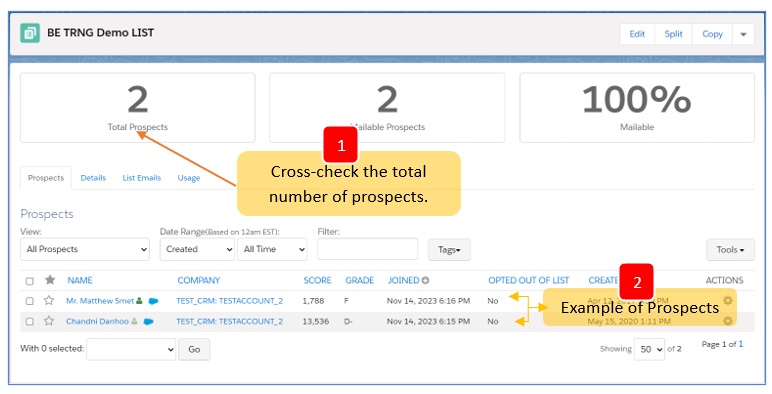
Scenario: below there is a list of prospects, which needs to be added to another Pardot list. It can be added to an existing list or a new empty list.
✔️ Crosscheck the list name and number of prospects to make sure it is the correct list.

Figure 1 – Example of a Pardot list
Step 2 – Select all prospect and choose “Add to list”.
Select all prospect in the list and go to the “Add to List” dropdown option below. Make sure all prospects have been selected by checking the selected number.

Figure 2 – Push list of prospects to another Pardot list
📝 Note: If there is a greater number of prospects in the list, the following text as in the example below will be displayed: All 50 records on this page are selected. Select all x records in this table. Select the records to make sure you selected everyone in your list.

Figure 3 – Larger list with more prospects
Step 3 – Confirmation
Once you “add to list” and click on the “Go” button, an alert will pop up for your final confirmation. Ensure it is the right list, correct number of selection and click on “OK” to complete the process.

Figure 4 – Confirmation to add to list
Create an email opens/clicks retargeting list
Email Opened/Clicked List
This list can be used as a segmented list for reminder emails. For example, if you want to target people who didn’t open/click an email, this list can be used as suppression list to exclude everyone who opened/clicked the email.
In this article, we focus on preparing email open list.
Step 1 – Navigate to the email report.
1. Go to the email sent ➡️ Click on “View Report”.

Figure 5 – Email Report
Step 2 – Select the prefered statistics.
2. Go to tab Report ➡️ Click on HTML Open Rate

Figure 6 – Email Statistics
Note: you can click on the blue numbers to get an overview of the statistics
Step 3 – Add to list
3. Select all prospects repeat the same “Add to list” steps as explained in this article previously.

Figure 7 – Prospect selection
📝 Note: If there is a greater number of prospects in the list, the following text as in the example below will be displayed: All 50 records on this page are selected. Select all x records in this table. Select the records to make sure you selected everyone in your list.
Push webinar leads to a Pardot list
This process involves pushing leads from webinar campaigns, which are hosted via GoToWebinar tool, to a Pardot list.
Step 1 - Navigate to the webinar on Salesforce
1. Navigate to Salesforce Dashboard ➡️ Scroll to Marketing Calendar
2. Select the preferred webinar.

Figure 8 – Select webinar via the marketing calendar
Step 2 - Choose a segment (Attended / Absent)

Figure 9 – Choose webinar segment
Step 3 - Add to list
After selecting the right webinar segment, select all prospects and repeat the same “Add to list” steps as explained above in this article.

Figure 10 – Add webinar leads to a list
Step 4 – Confirmation
Once you “add to list” and click on the “Go” button, an alert will pop up for your final confirmation. Ensure it is the right list, correct number of selection and click on “OK” to complete the process.

Figure 11 – Confirmation to add to list
How did we do?
Learn Pardot on Trailhead
Create Solution Forms for Domain and Solution Pages
